Here, we are going to review the Movavi Video Editor Plus. We thoroughly tested the software for its features, performance, and other important specifications. Read along to find out more about the same.
What We Like
Very easy to use UI Beginner friendly Available for Windows and Mac Several Filters, Transitions, and Effects are available AI Background Remover (Chroma Keys) AI Noise Removal Color Adjustments Affordable
What We Don’t Like
Doesn’t export to H.265 (HEVC) Very minimum free-to-use transitions, filters, and effects You have to subscribe to “Effects Store” to get different effects No update for Apple Silicon (M1 or M2)
“Click Here To Download Movavi Video Editor”
A Brief Note on Movavi Video Editor Plus
Majority of the content online nowadays is video. Be it YouTube, TikTok, or Instagram, most content creators are focusing on producing videos. As a result, there is a good demand for tools that aid in creating this content. On the hardware side, we have cameras from Sony and Panasonic that are targeting vloggers. Small time content creators can get away with their smartphone cameras and a basic lighting setup to shoot videos. But coming to the software side, the video editor is the main and probably the only tool you might need. There are several video editing software in the market. Adobe Premier Pro and Apple Final Cut Pro are two most popular video editing software. Several famous YouTubers and even many Hollywood productions (movies and TV Shows) use these two software to edit and export videos. The problem with these software is that they are not beginner friendly and importantly, they cost a pretty penny. What if you are looking for a simple, affordable and easy to use video editor? If you are starting your YouTube journey, you don’t want to spend too much money on a video editor and too much time learning how to use it. This is where the likes of Movavi Video Editor come into picture. It is a software from the house of Movavi, a multimedia company that is developing different kinds of tools for images, videos, conversion, PDF, etc. Movavi Video Editor is available for both Windows as well as Mac operating systems. It is a very lightweight tool, less than 100MB for the executable and after installation, the disk space was less than 400MB. Without further ado, let us jump straight into the review of the Movavi Video Editor.
Simple UI
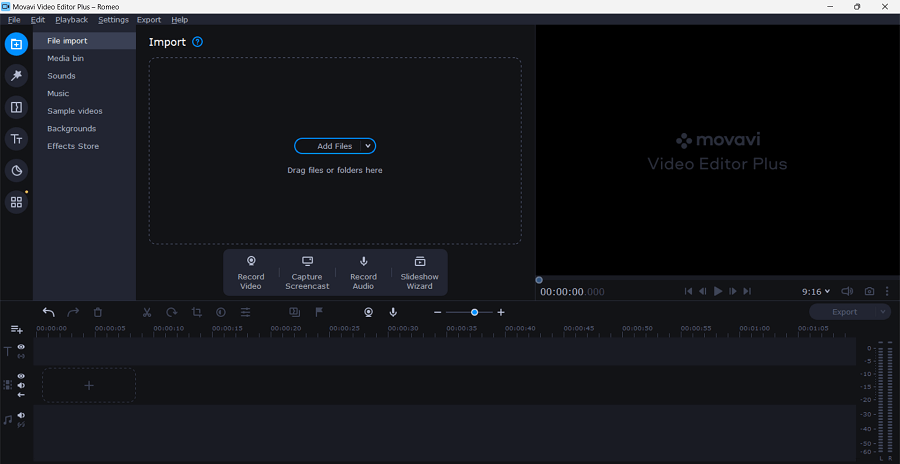
Once you download the software, install it, and open it, you will be greeted with one of the simplest UI for a video editing software.
On the left, you have all the buttons for the essentials such as Media Import, Filters, Transitions, Text, Stickers, and More Tools. Depending on the mode you select, the pane just right to this will feature the specific menu or options. Over the right, we have the video preview window. This is just the top half of the UI. The entire bottom half has the timeline window. Just above this, we have the quick use shortcuts to Split, Rotate, Crop, bring-up Color Adjustments, invoke clip properties, Transition Wizard, Add Marker, Record, Video, Record Audio, and Zoom in or out the timeline. We feel that this layout with all the buttons and shortcuts isn’t intimidating for beginners and they can easily start editing videos. If you used any video editor before, then you will feel the layout is similar to most professional video editor out there.
Basic Features
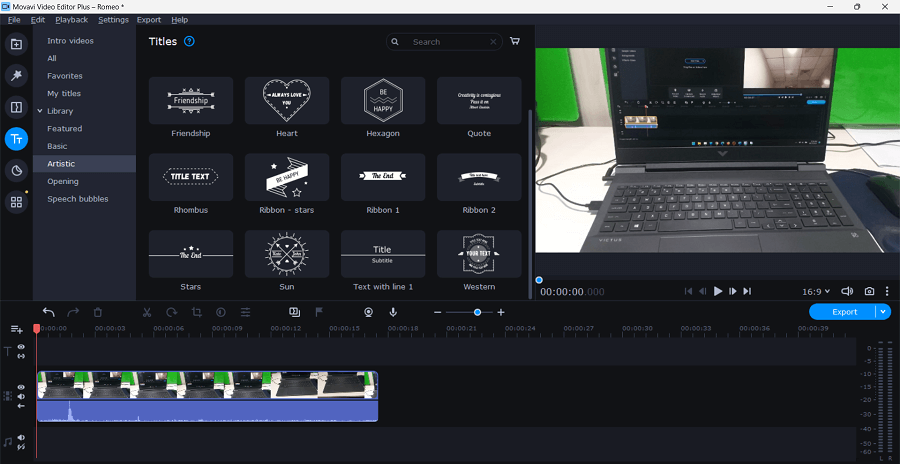
Starting a project is Movavi Video Editor Plus is very easy. Just import video clips to the media bin, add these files to the timeline, and start editing them. It is that simple. We tested with different video formats including but not limited to videos from iPhone, Android Phone (Samsung), Sony ZV1, and Sony Alpha 7 III. Movavi supports almost all the modern video containers and codec including the HEVC videos. Sadly, we did not find an option to export the videos to H.265 (or did we miss something). Depending on the orientation of the source videos, Movavi Video Editor automatically adjusts the aspect ratio of the output video. 16:9 for YouTube, 1:1 for Instagram Post or Facebook, 9:16 for Instagram Story or TikTok, 4:3 for LinkedIn, or an option to set your own aspect ratio. As this video editor is aimed at beginners rather than professionals, there aren’t many trimming options. You can just split the clips and trim whatever clips you don’t need. You can easily drag and drop the clips anywhere in the timeline. Another basic and important feature that YouTubers love is Transitions from scene to scene or clip to clip. Helpfully, Movavi has several transition effects that you can use. Working with Text is also very simple. From basic text, to titles, artistic formats, and even speech bubble, you have all kinds of text format to use in your videos. Instead of regular text, you can use the “Intro Videos” feature of Movavi Video Editor Plus to add something new to the introduction part of your videos.
Filters allow you to apply different kinds of visual effects to the video clips. If you want to make a dramatic scene or change the feel of a video to look retro, then you can use filters. Color Filters, Blur, Overlays, Light Leaks, etc. are some basic filters. Explore more filters in the Movavi Video Editor Plus Software. An Instagram or TikTok video isn’t complete without Stickers. So, if you want to add a bunch of stickers to your video, then use them.
Advanced Features
If we switch to the “More tools” on the left pane, you can see some advanced video and audio editing tools. These tools are complex for beginners and you need to spend some time practicing and mastering these tools.
1. Video
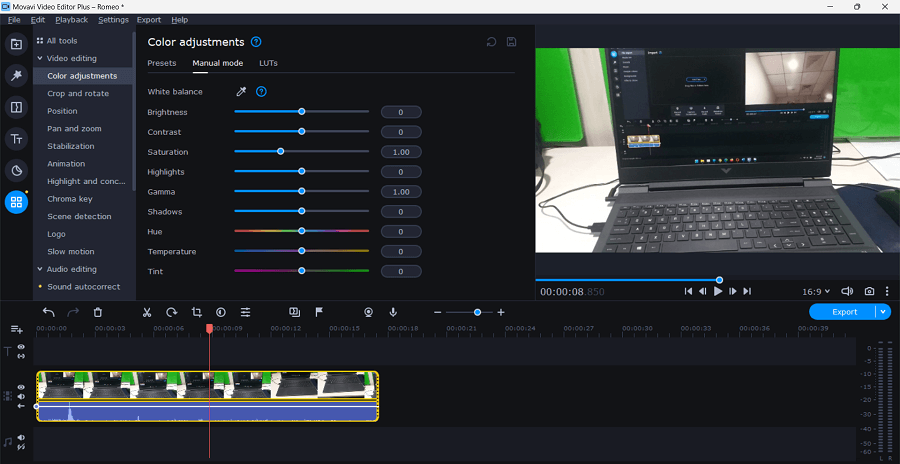
Color Adjustments is the first video tool that falls under the “advanced” category. You can use the presets and LUTs to automatically set the colors in the video. But if you are a little bit more adventurous, then you can use the manual mode and adjust all the parameters such as White Balance, Brightness, Contrast, Saturation, Gamma, and many more.
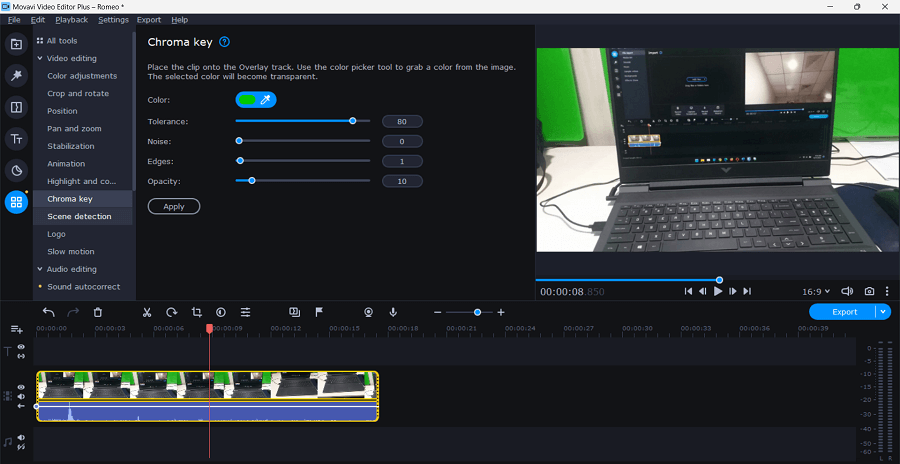
If you want to rotate the video, zoom in on an object inside the frame, remove those annoying black bars, or adjust the borders, you can use the crop and rotate feature. You can also adjust the position of the frame to make picture in picture, add logo, side by side, or top and bottom. A very useful feature is Pan and Zoom. You can add this effect that mimics the camera pan and zoom shots. Movavi Video Editor has a special AI Stabilization tool that can remove small camera shakes in a clip. Another AI Tool in the Movavi Video Editor Plus is Chroma Key. It is a fancy name for background remover. Simply select the color you want to remove and you can remove the background or replace it. Very useful if you use green screens.
2. Audio
Coming to Audio side of things, Movavi Video Editor has a good collection of audio related tools. Perhaps the most useful tool will be the AI Noise Removal. If you shot any video outdoors, this tool can help you remove the noise from surroundings.
There are also a bunch of Audio Effects such as Echo, Muffled, Oscillation, etc. that you can use to create fancy sound effects. Some other Audio Tools are: Sound Autocorrect, Equalizer, Compressor, Reverberation, Beat Detection, and Synchronization.
Performance
We tested the Movavi Video Editor Plus to edit and export one YouTube Shorts video and one regular YouTube video for our sister YouTube Channel. Our system setup is a Windows Laptop with Intel i7 12700H CPU and RTX 3060 6GB GPU. We performed all the tests with wall adapter always plugged in and laptop fans running at max RPM. Also, we enabled the Nvidia Hardware Acceleration as well as Optimize HD Video option. We did not face any stuttering or crashes while editing and exporting the videos. The CPU usage stayed close to 100% all the time (due to Optimize HD Video feature, that creates small proxies in the background for fast editing). There are several export options in the Movavi Video Editor Plus. You can select the container (MP4, MKV, MOV, AVI, etc.), adjust the resolution, frame rate, quality, etc.
We found that our version of Movavi Video Editor Plus supported only two video codec: H.264 and MJPEG. In the codec settings, you can adjust the speed of the export. For YouTube Shorts video, our output was set to 1080 × 1920 MP4 60FPS with “fast” encoding speed. Coming to the regular video, the output settings were 3840 × 2160 MP4 60FPS with “fast” encoding. The export process was smooth and it took a minute and half to export the 4K video, which we thought was a decent enough speed.
Price
Now, the important part of the product, its price. For a 1-year license of the Movavi Video Editor Plus Software, you have to pay $54.95. But there is also a lifetime version at only $74.95. This is relatively affordable than other video editors such as the Adobe Premier Pro. There is a 7-day free trial period, where you can explore all the feature of the Movavi Video Editor and if you like it, you can purchase the yearly or lifetime subscription. Sadly, the free version has some restrictions (watermark on the output is the worst).
Final Words
So, what do we think of the Movavi Video Editor? We asked a colleague, who is a complete noob in video editing (never used any video editing software before) to use this software. They we able to quickly understand the layout, make basic cuts and trims and even export the video in less than 30 minutes. What we are trying to say is that the Movavi Video Editor Plus is a very good beginner video editing software. Its simple layout, easy to use effects, transitions, and filters, and ability to hardware accelerate to speed up the export job are definitely some main benefits. Keep in mind that you get access to only a limited number of freebies (transitions, texts, titles, etc.) and you have to purchase them from Movavi’s Effect Store. If you are just starting videos for YouTube, then you can easily get away without spending anything else other than purchasing the software. Comment * Name * Email * Website
Δ
![]()
![]()
![]()


![]()
![]()

